clickfraud, “Internet Zaschita” llc., info@clickfraud.dev
Quick Navigation
General information
Here is a brief overview of the main methods to protect advertising campaigns from bots. You can read the full article at the following link – https://habr.com/ru/post/722146/:
- Try to “fragment” your advertising campaigns as much as possible. Each advertising campaign is limited by its own daily/weekly budget. If there is click fraud in one or some of them, it will preserve the budgets of other advertising campaigns.
- Create multiple advertising campaigns for different regions.
- Set maximum click cost restrictions in bid management strategy settings (or specify the desired conversion cost when working with conversion strategies). This will help avoid overly expensive clicks.
- Wherever possible, switch to conversion optimization strategies, preferably with payment for conversions. Once you start paying for conversions, bots or people (competitors) who simply click on your ads will stop causing harm. Now the budget is deducted not for clicks but for conversions.
- One of the main methods to combat click fraud provided in the Yandex.Direct interface is the creation of a list of IP addresses for which your ads are not shown. Yes, manually adding an IP address is not difficult. However, it can be challenging to identify this IP address (as it is not visible in Yandex.Direct statistics). It is better to let specialized services like clickfraud.dev handle this.
- Turn off impressions in regions where click fraud is detected. If IP addresses are not visible in Yandex.Direct, the regions from which clicks came are literally “on the surface.” Add such a region to the list of exclusions for displaying ads, at least temporarily.
- Determine the exact keywords that are experiencing click fraud and add such keywords to the negative keyword list. Add them exactly to avoid losing derived traffic from such a query.
- When creating an advertising campaign, try to use the largest possible list of more specific queries. Work on semantics. Remember that ads configured for broad search queries are much easier to click.
- When detecting click fraud, try to identify the traffic segments where click fraud is occurring.
We haven’t actively monitored our competitors’ activities, but from our interactions with customers, we’ve noticed that people turn to us when other click fraud protection systems don’t provide effective solutions. They choose to stay with us and appreciate our more adaptable bot-blocking settings 🙂
If you have any questions, please don’t hesitate to leave a message in the chat, and one of our operators will contact you shortly. Our team is available from 11 AM to 5 PM on weekdays (Moscow time)
Our system continually advances, offering round-the-clock protection for your advertising campaigns. In our experience, fingerprint analysis doesn’t consistently guarantee high-quality protection because modern browsers anonymize both users and bots, making precise and accurate visitor identification challenging. That’s why we prioritize multifactor analysis using a neural network in our approach, rather than relying solely on browser fingerprinting.
If you have any questions, please feel free to leave a message in the chat, and an operator will get in touch with you shortly. Our team is available from 11 AM to 5 PM on weekdays (Moscow time).
Indeed, and here are the reasons:
1. A conversion on your website relies on an initial ad click.
2. Click fraud drives up the cost per legitimate click because of numerous false clicks. Without anti-fraud tools, we can’t filter out 9 bot clicks to ensure 1 genuine click, leading to paying for all 10 clicks.
3. Each genuine click’s cost affects the overall conversion cost. The conversion cost is derived from the sum of valid click costs and the likelihood of a sale. For example, if 100 actual visitors come to the site from ads, and three buy something, the formula is: 100 clicks * cost per click / 3 purchases = cost per conversion.
Ultimately, ad campaign fraud inflates the cost of each conversion. We suggest placing application forms lower on the page to weed out irrelevant responses. Additionally, making the application slightly more complex, by adding a few extra questions, can be beneficial. These measures will protect your precise conversion targets. For further details, consult an external resource, like this link.
By using our click fraud protection, you can enable IP blocking. For Yandex.Direct, this is done by adding the Director token in your account, and for Google Ads, we need access to your ad campaigns through your Google ID.
We automatically block harmful visits based on IP (the attacker’s location). However, there are limitations in advertising systems:
- Yandex limits to 25 IP addresses.
- Google allows up to 500 IP addresses, but this may still be insufficient.
We believe IP blocking alone isn’t fully effective in click fraud protection but can be a helpful secondary measure. Our service includes this feature. After blocking by IP in Yandex.Direct, we categorize visits with identifiable ClientID into the Yandex.Metrica segment labeled asBadSession. Note that when the IP block list is full, older IPs are removed for new ones.
Important for Yandex.Direct: If you have ads in different accounts, blocked IPs can only be transferred to the account specified in our dashboard. Each account requires its specific token. For agency representatives, setting the client’s login header is necessary. Working with multiple accounts simultaneously isn’t possible, and token access is restricted to campaigns under that login.
Keep in mind, if a botnet with many proxies, like 400 or 500, attacks your ad campaigns without daily budget limits, it can drain your budget. It’s vital to analyze data in our dashboard and adjust your ad campaign settings, such as disabling sites in RSYA. We continually expand our analytical data to better combat click fraud.
Usually, we can stop these visits using ClientID, browser fingerprint, and other factors. But, bots are constantly improving and finding ways around our defenses. We’re always working on new methods to block them.
To start using our protection on your site, you can sign up using this link and get 1000 rubles in your account, which covers 10 days of protection under the Starter plan.
If the code for your Yandex Metrica counter has been modified, you must make an update in the site settings within the corresponding field. Afterward, initiate a “Data Update” by clicking on the button to generate the GTM code. This final step is crucial because we determine the Metrica counter code in the tags based on the input provided in the dashboard for each specific site.
Detailed steps for changing the Yandex Metrica counter code, as depicted in the screenshots, are as follows:
On the screen below, replace the Yandex Metrica counter code and then update the Yandex Metrica and Yandex Direct tokens (the link to the update is available by clicking the gray question mark). Don’t forget to click the “Save” button.
Once you have completed these steps, click on the “Update Data” button to refresh the tags in your GTM code associated with the Metrica counter code.
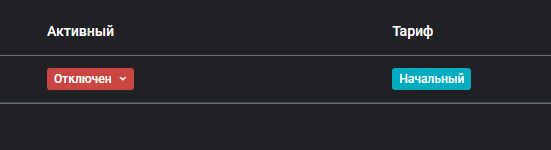
Your current tariff status, as indicated on the website, can be found on the “My Sites” page.
To choose or modify your tariff, simply click on the tariff status field (for instance, the screenshot below displays the status as “Initial”).
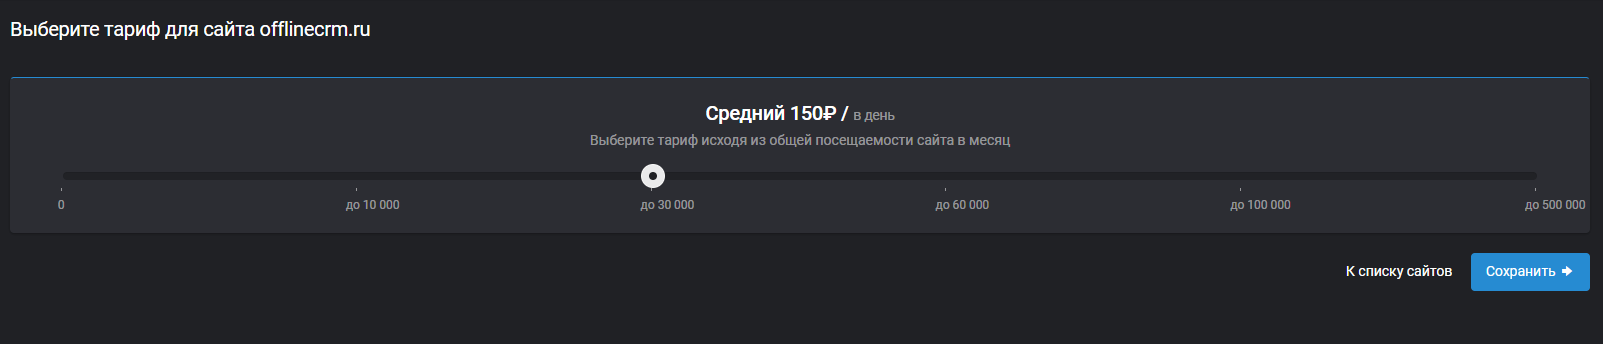
Afterward, on the new page, you will have the option to select the appropriate tariff. The billing will occur daily while the protection is active.
Funds are debited from your account balance on a daily basis. The deduction amount is determined by the number of active sites and the chosen tariffs for those sites. When your balance reaches a negative value, deductions cease, and the protection stops functioning. To reactivate the protection, you must replenish your balance and enable protection in our dashboard.
You can review the specifics of these deductions on the “Balance / Account Movements” page.
As a result of the numerous inquiries and suggestions concerning competitor click fraud, we’ve included this statement in our Knowledge Base: We do not participate in any kind of ad clicking; our focus is on safeguarding against click fraud.
This parameter enables the initiation of an Event during the initialization of the Metrica counter. This is essential to ensure that our scripts run smoothly after your Metrica counter is loaded, without causing interference, and can interact with it correctly. Please remember to include a comma when adding this parameter, as it’s a common oversight (sometimes our clients forget to include a comma after the previous parameter when adding this one):
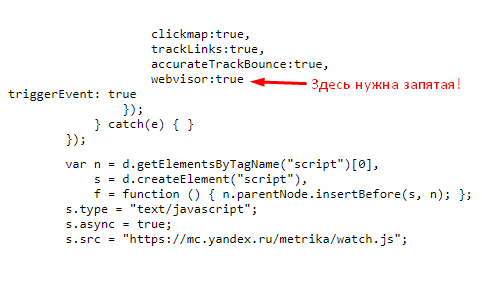
The triggetEvent parameter is documented in the official documentation. You can find more information about it on this page at the end of the table: link to the Yandex.Metrica documentation
At times, within your personal account tables, you might notice that website visitors are coming from various cities and countries, even if your advertising campaigns are specifically targeted at your city. We don’t control the source of this traffic; we merely analyze all website visits.
The occurrence of visits from different regions could be due to some bots accurately interpreting ad links within the intended region, while other bots, utilizing proxies, access these ad links from different countries. Alternatively, it might be a result of incorrect ad targeting settings.
We analyze every visit to your site, whether it’s advertising-related or not.
The tariff is determined based on your site’s total traffic because we conduct real-time visitor analysis, detect fraudsters (bots), and prevent them from displaying ads. The greater the traffic volume, the more servers (and other resources) are required for analysis.
Furthermore, within your personal account, there is the option to block non-advertising traffic if needed.
Aside from adding the standard protective elements such as creating a Segment, Metrica, and Direct tokens (for Yandex), and adding Google ID (for Google Ads), we also provide additional and highly useful tools for safeguarding your advertising campaigns.
Behavioral Factors: You can find these in your personal account under “My Sites” / “Edit Site Section” / “Blocking Settings.”
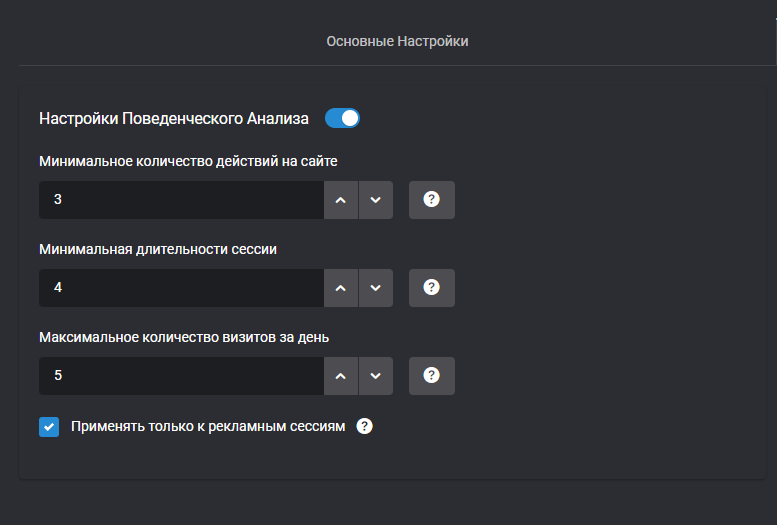
Enable the ‘Analysis of Behavioral Factors’ option to block users (bots) who do not meet the criteria outlined below:
- Apply only to advertising sessions: When activated, other behavioral parameters will only assess visits through advertising and block them by IP address (in Yandex.Direct and Google Ads systems). If this option is disabled, all visits will be analyzed. All Yandex-related blocks will be directed to a segment in Yandex.Metrica.
- Minimum number of actions on the site: Sessions that don’t meet this specified indicator will have future ad displays blocked (if set to 0, the parameter is disregarded). For example, if a user clicked on an ad but only performed one action, the system will block future ad displays for them. Actions on the site include clicks, scrolls, and resizing the page, essentially any user interaction.
- Minimum session length in seconds before blocking: Sessions that fall short of this duration will be blocked (if set to 0, it’s not applied). For example, if a user clicked on an ad but spent less than 10 seconds on the site, the system will block them.
- Maximum number of visits per day: Users who exceed this number of daily visits to your site will be blocked. For instance, if a user clicked on an ad more than 3 times in a day, the system will block them. (if set to 0, the parameter is disregarded)
Note: If a user (or bot) meets any of the specified criteria, the system will block future ad displays for them.
Cluster Analysis: You can configure this parameter in the dashboard under “My Sites” / “Site Editing Section” / “Blocking Settings.”
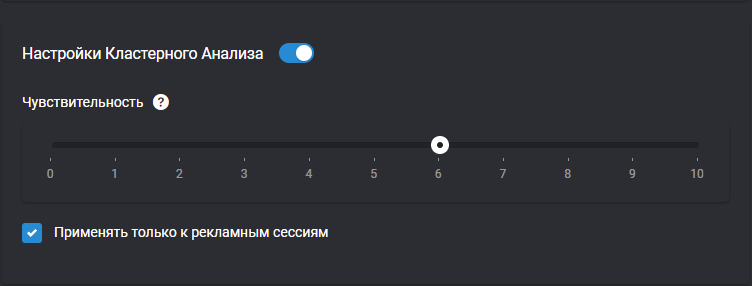
Our system employs machine learning methods to analyze the traffic on your site. By default, this functionality is enabled but can be turned off or adjusted.
- If you don’t want machine learning cluster algorithms to analyze your site traffic, uncheck the ‘Cluster Analysis’ box.
- If you want only sessions that originate from advertising to undergo intelligent analysis (excluding all general sessions), check the ‘Only sessions through advertising’ box.
- There’s also an option to fine-tune the algorithm’s sensitivity if the current settings don’t suit your needs. The recommended sensitivity value is 6. You can lower or raise it within the range of 1 to 10. Higher values will result in more sessions being blocked.
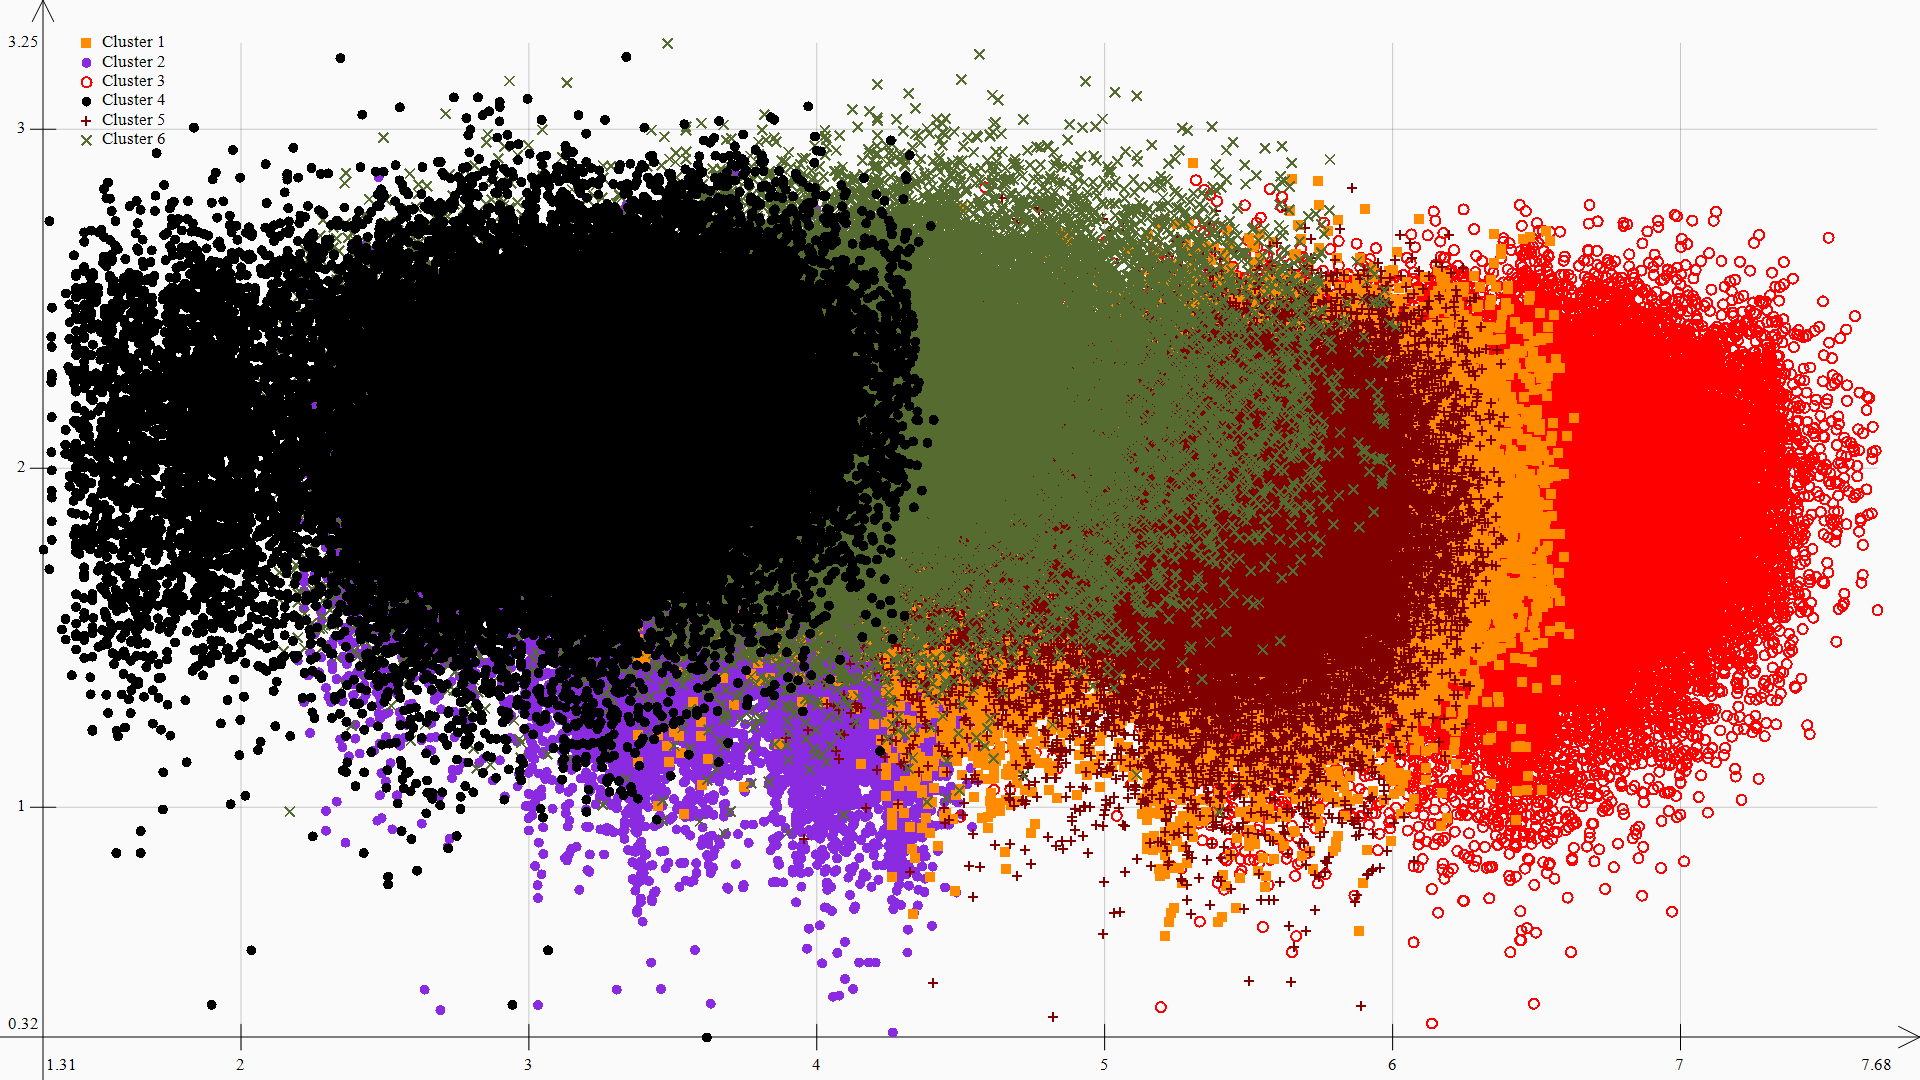
How does cluster analysis work? It’s a machine learning algorithm that, based on a set of parameters (black box model), determines whether a bot has visited the site. Depending on the analysis data, it assigns the visit to one of six clusters (see the figure below). A value of 6 indicates the visit is placed in a cluster where 100% are bots. However, since bot algorithms vary and constantly evolve, we recommend increasing this value to 7-8 if you suspect bot visits on your site due to click fraud. Values above 6 consider data not just from the bot cluster but also from the average cluster, where ‘suspicious’ visits are identified. There is no 100% certainty in this cluster; it may be a well-masked bot or a real user exhibiting suspicious behavior.
In the z.clickfraud.ru dashboard, there are two tables: Detailed Report on Blocks and Budget Savings.
It’s essential to note that the number of site visits may differ between our system and Yandex/Google Analytics. For more information on why this might happen, refer to this guide: Why Statistics Differ Between Yandex.Metrica and Google Analytics
- Detailed Report on Blocks
In the Blocked Sessions section, sessions marked as “suspicious” by us are displayed. We automatically (every 10 minutes) send the corresponding parameter to Yandex (and/or Google) through the API.
We automatically block these sessions in your advertising systems, to which we have access. Bot identification is based on the two previous tables and additional internal machine learning algorithms developed by our company.
- Budget Savings
To calculate savings, we combine reports from advertising systems with our data. The minimum savings are calculated using the formula: Number of our system’s blocks * Click cost. The potential savings can be much more significant because bots that click on ads never click only once. Their goal is to do as much damage to your budget as possible.
As of now, the savings report works for the Yandex.Direct advertising system. To enable this function in Yandex.Direct, you need to add the Direct token in the personal account (Advertising Systems, the second item). Learn more about how to do this here.
It’s important to note that if a campaign is attacked by a bot with a large number of proxies, for example, 400 or 500, and there is no daily budget limit on the advertising campaigns, it will negatively impact the budget. Therefore, it’s crucial to review the analytical data provided in our personal account and adjust the settings of advertising campaigns accordingly. For example, disabling sites in YAN and so on. We, in turn, continually increase the range of analytical data that can help combat ad fraud.”
It appears that you’ve shared guidelines regarding the setup of UTM parameters in Google Ads to ensure precise tracking and analysis through your analytics system. In essence, your core algorithm relies on capturing session data via a script on the client’s website, with a particular emphasis on the referral link. Accurate analysis necessitates that advertising platforms incorporate UTM tags within these links, which carry details about the ad, campaign, and more.
Because Google doesn’t automatically create links to target pages with the required parameters, your protective algorithm may encounter difficulties in identifying ad clicks. To address this issue, you’ve recommended either configuring Google’s link generation in accordance with the provided instructions or activating the option to block all users through advertisements in the ‘Manage Blocks’ section of the personal dashboard.
If you have specific queries or require further assistance, please don’t hesitate to reach out!
When creating links to destination pages, please follow these steps:
1. Verify that the designated page unquestionably exists; when clicked, its link should lead to the intended page, not:
- An empty page
- A placeholder page generated by CMS or server engine
- Redirecting to the website’s homepage
2. When generating links for ‘Target pages’ in Google Ads, you should include a set of parameters after the existing link:
- utm_source=google
- utm_medium=cpc
- utm_campaign=net|{network}|cid|{campaignid}
- utm_content={creative}
- utm_term={keyword}
- placement={placement}
- adposition={adposition}
- matchtype={matchtype}
- device={device}
All values enclosed in curly braces will be automatically substituted with user and click parameters when the transition occurs. All parameters must be separated by ‘&’ and a ‘?’ should come before the parameter set. If certain parameters already exist in the link leading to the target page, there is no need to add an extra ‘?’. For instance (‘link to the target page’ -> ‘link to be defined in Google ads’):
«https://example1.com/» -> «https://example1.com/?utm_source=google&utm_medium=cpc&utm_campaign=net%7C{network}%7Ccid%7C{campaignid}&utm_content={creative}&utm_term={keyword}&placement={placement}&adposition={adposition}&matchtype={matchtype}&device={device}»
or
«https://example2.com/?page_id=14567» -> «https://example2.com/?page_id=14567&utm_source=google&utm_medium=cpc&utm_campaign=net%7C{network}%7Ccid%7C{campaignid}&utm_content={creative}&utm_term={keyword}&placement={placement}&adposition={adposition}&matchtype={matchtype}&device={device}»
In the second example, the original link already contained the ‘page_id’ parameter with the value ‘14567’. As a result, the ‘?’ was already part of the link, so there’s no need to add it again. Simply separate the existing parameter from the new Google parameters using ‘&’.
These parameters are known as ValueTrack, and they automatically replace specific values in the URL when a click occurs, instead of the placeholders in curly braces. You can find a complete list of parameters that can be included here (in the expanding section under ‘Final URL, tracking template, or custom parameter’).
These parameters are included in the URL to enable additional analytics tools (such as our service clickfraud.dev) to analyze traffic. Consequently, through ValueTrack, Google transmits certain details about the visit. With this information, we can trace the visit back to an advertisement and determine which specific advertising campaign received the click.
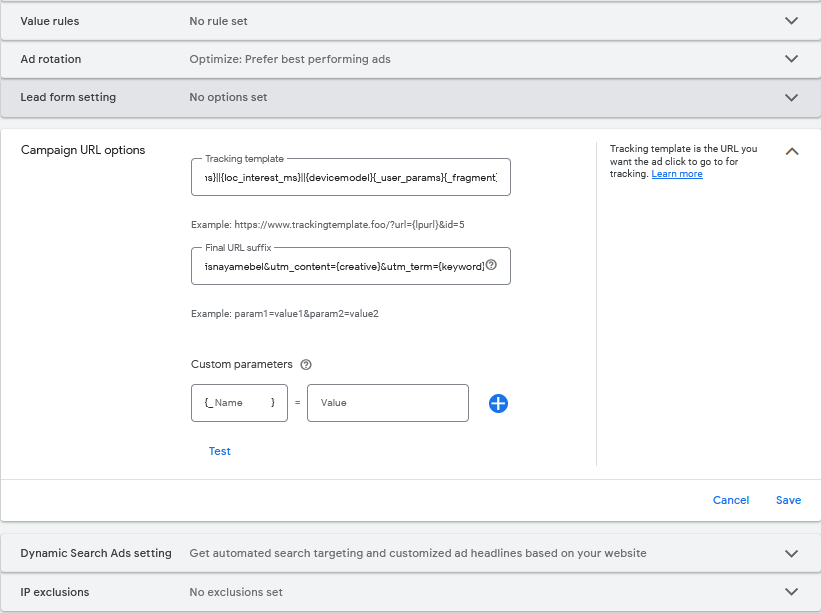
Tracking template:
{lpurl}?utm_source=google&utm_medium=cpc&utm_content=v2||{creative}||{targetid}||{keyword}||{adgroupid}||{campaignid}||{adposition}||{network}||{placement}||{target}||{adtype}||{merchant_id}||{product_channel}||{product_id}||{product_country}||{product_language}||{product_partition_id}||{store_code}||{feeditemid}||{matchtype}||{device}||{adwords_producttargetid}||{loc_physical_ms}||{loc_interest_ms}||{devicemodel}{_user_params}{_fragment}
Final URL Suffix:
utm_source=google&utm_medium=cpc&utm_campaign={campaignid}_poisk_rf_ofisnayamebel&utm_content={creative}&utm_term={keyword}
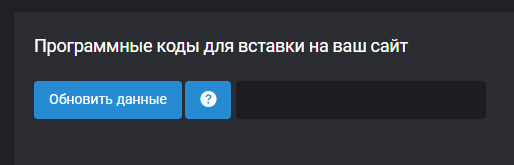
1. Once you have registered and configured your site, you can create the GTM code in the Site Settings. This code must be implemented on your website as per the guidelines in the Settings and our email instructions.
It’s essential to install the GTM code on every page of your website. Without this code, tracking and analyzing site visits for future blocking will not be possible.
The GTM code can be incorporated into any CMS that allows for code insertion. This is applicable to most CMS platforms. We have provided guides for the top three CMS platforms:
For WordPress, there’s also an option to install through the Google Tag Manager for WordPress plugin. The steps are outlined below:

Proceed to the Plugin Settings:

Then choose the following settings. Note that you should replace GTM-XXXXXXXXXX with the GTM container identifier provided in our email. The complete GTM scripts are sent via email, but you only need to use GTM-XXXXXXXX from it and enter it in the Google Tag Manager ID field, as illustrated in the screenshot below:

Once these settings are configured, data will begin transmitting to us within 30 minutes.
Preferably, place our code above Yandex.Metrica and Google Analytics.
Ensure to add the code to all your website pages. We analyze numerous bot behavior aspects, like page transitions and mouse movements, to prevent future unauthorized access. If some pages are not analyzed, the protection algorithm might not function efficiently on your site.
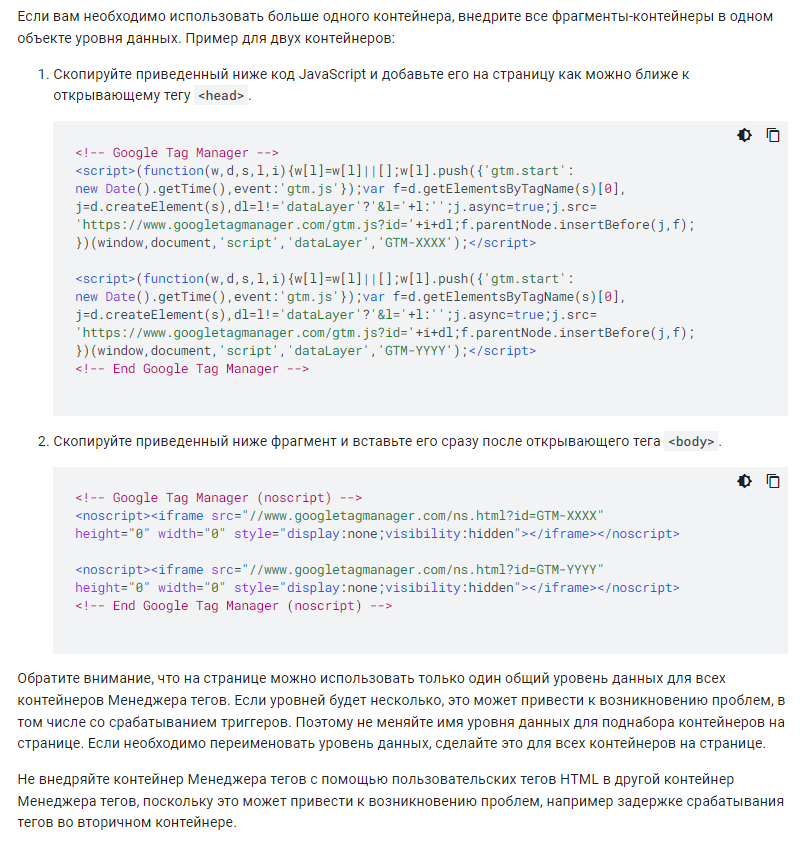
If there’s already a GTM code on your page, add ours as per the official guidelines – https://developers.google.com/tag-manager/devguide#multiple-containers
After installing the GTM code on your site, verify its accuracy in our dashboard on the main page.
Important: Some platforms like Flexbe may have unique characteristics that could hinder our program’s functionality. If issues arise post-GTM code implementation, please reach out to our support team on our website.
No service can guarantee 100% protection against click fraud. We assess many technical and behavioral aspects of each visit and keep adding and refining criteria to enhance our service and remain cutting-edge.
It’s vital to recognize that if ad campaigns are hit by a bot with numerous proxies, say 400 or 500, and there’s no daily budget limit, it could hurt your budget. Thus, reviewing the analytical data in our dashboard and tweaking your ad campaign settings is essential. This might include disabling sites in the Yandex Advertising Network. We are constantly broadening our analytical data scope to better fight click fraud.
Here are a few potential reasons, with the most common ones outlined below:
- Placement of the Tracker: Analytics systems may be positioned in various sections of the website’s code. One could be in the header, while another might be in the body. In such cases, disparities in statistics are likely. Therefore, we recommend positioning our script as close to the beginning of the header as possible.
- Differing Identification Methods: Each tracking system employs its own set of parameters for identifying users. Typically, these parameters differ among various analytics systems. Consequently, one system might register 2 site visits as 2 distinct visitors, while another might consider them as one visitor, depending on its identification method.
- User Access from Different Devices: When a user accesses the site from different devices while being logged in to Yandex or Google, Metrica or Analytics would regard them as a single visitor. Clickfraud lacks the capability to track these parameters, so we would count them as 2 separate visits.
We examine bot behavior, and in order to accomplish this, it’s crucial to monitor not just how it arrived on your site but also the duration of their stay, the actions they perform, and their mouse movements. If you only place the code on the homepage, it greatly restricts our algorithm’s capabilities and impedes effective analysis and blocking.
Principle of Our Protection Algorithm:
- Collect data on sessions.
- Analyze data using machine learning algorithms to identify bots.
- Create audience segments with yaClientID and adjust -90% (for protection in the Yandex advertising system).
- Block IP addresses of identified bots at the campaign level.
General Algorithm of Actions:
- Register on the page z.clickfraud.dev.
- Add one or several sites to your account, ensuring you fill in all the necessary information for site setup, including Yandex Metrica and Direct tokens, and the Metrica counter number for Yandex advertising protection, or Google ID for Google advertising protection.
- Upon registration, you have a 10-day free protection period with the Starter plan. After the trial period, make a payment based on the monthly traffic on your site (slight excess is permissible). You can review the plans here, and each site can have its plan individually selected.
- Create a unique GTM code on the Edit Site Settings page for each site.
- Install the GTM code on all pages of the protected site. If your site uses a popular CMS, this can be done quickly. Find out more here, and understand why it’s essential to install the code on all pages here.
- Ensure that the Yandex Metrica counter code includes the parameter “triggerEvent:true.” Without this parameter, our code may work less efficiently. Learn more about it here.
- Confirm that UTM tags are transmitted in your advertising campaigns. Learn more here. Yandex provides information on setting up UTM tags here.
- After installing the GTM code, we will begin collecting data on visitors to your site for subsequent blocking. If you selected Google protection and provided your Google ID in our control panel, you will receive an email to your Google account-associated email within 24 hours, asking you to grant access to the user clickfraud.access@gmail.com. Follow the instructions in the email. If you need protection for Yandex advertising, learn how to set up the Yandex.Metrica segment here.
- If necessary, adjust the default settings for behavioral factors and the sensitivity of cluster analysis in Settings, as these are essential elements for effective bot blocking. Learn more here.
- Add other sites to your account as needed. Payment will be debited from your account separately for each site according to the tariff.
- For additional information on other topics, consult our Knowledge Base here.
Overview of the Control Panel:
We provide a welcome bonus of 1,000 for all new clients upon registration. This amount is enough for several days of free use of our click fraud protection service.
Overview of the Personal Dashboard:
You can add funds to your account anytime by clicking the “Balance” button located in the upper right corner of our dashboard at z.clickfraud.ru.
To create an invoice, it is advisable to complete the organization data fields within the “Payment Settings” section.
Following this, navigate to the “Add Funds/Bank Transfer” section to generate an invoice. Once you choose the payment amount and click the “Pay” button, you will receive an invoice for the specified amount in your email.
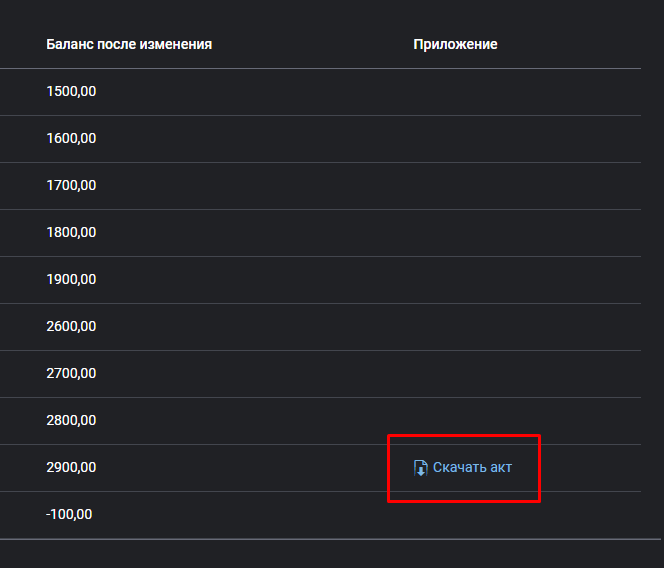
To obtain documents for closure, kindly visit the “Balance” / “Billing History” page using the following link: https://z.clickfraud.ru/Payment/BillingHistory
On this page, you can access and download the invoice, as illustrated in the provided screenshot:
If you require an invoice via Electronic Document Flow (EDO), please get in touch with our support chat on our website or via email at info@clickfraud.ru. In your request, include your login, complete company name, Steuernummer (Taxpayer Identification Number), and specify the period for which you need the documents.
We operate through SBIS (TENSOR operator) and can facilitate Electronic Document Flow (EDO) exchanges.
Setting up Google Ads Protection
Regrettably, not all types of campaigns in Google Ads can be safeguarded against click fraud.
We provide protection for the Search Network and GDN (Google Display Network).
The following campaign types cannot be protected:
- Shopping campaigns
- Smart campaigns
- Discovery campaigns
- Video campaigns
- Local campaigns
- App campaigns
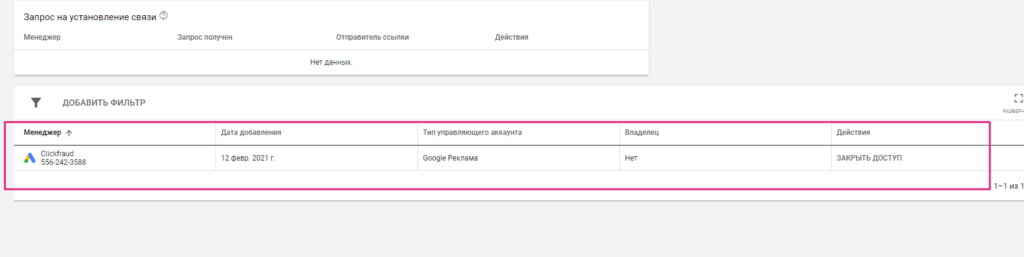
Upon submitting your Google ID (which is typically processed within a few hours but may take up to a day in rare instances), an email will be sent to you enabling us to access your account. As soon as we confirm this access, the protection mechanism will be activated and will start blocking IP addresses automatically.
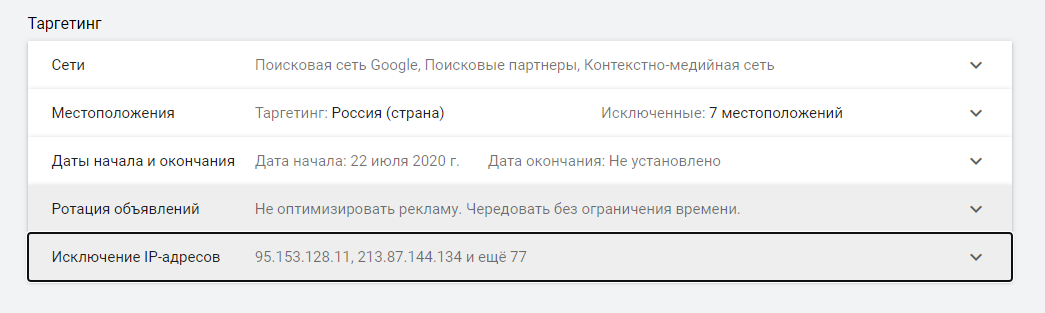
Google Ads permits the addition of a maximum of 500 IP addresses to the exclusion list at one time. Once this limit is attained, older IPs are automatically replaced with new ones.
It’s crucial to note that the email will be sent to the email address linked to your Google Ads account, which might be different from the one you used to sign up for our service. Additionally, remember to check your SPAM folder for this email.
For an in-depth understanding of the steps involved, please consult the guide available at – https://clickfraud.dev/knowledge/nastrojka-zashhity-google-ads/kak-vklyuchit-zashhitu-google-ads/
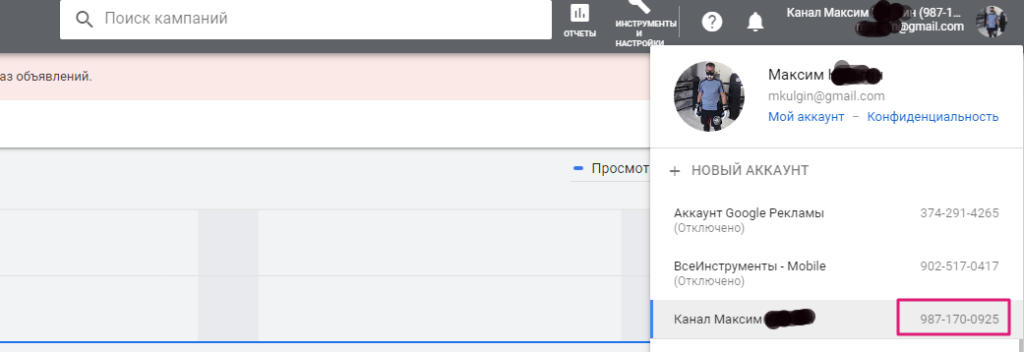
For safeguarding your Google Ads advertising, you must activate the feature in your personal dashboard and input your account ID, such as: 987-170-0825. This feature is located in the Website Editing (My Sites/Edit) area, specifically in the first block under Basic Settings.
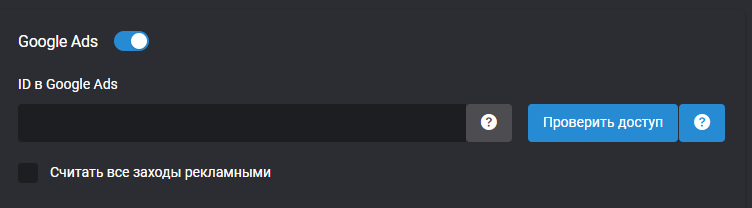
Your ID is visible in the upper right corner of your Google Ads personal dashboard, next to your account name.
Take note — a manager account ID is not applicable, even if it has permissions for the needed account with your campaigns. The ID required is from the account where your ads are actively running.
Remember that the ID follows the pattern: XXX-XXX-XXXX, with X being a number. Within a few hours (or a day in unusual cases), you’ll receive an email at the address linked to your Google Ads account. This email will request you to allow access for the user clickfraud.access@gmail.com. Adhere to the instructions in the email.
Why is this necessary?
This is to seamlessly send data about identified bots to Google Ads, enabling the blocking of their ad displays (this is the sole function). Keep in mind, access can be revoked anytime. After granting access, information about the detected bot IP addresses will be automatically transmitted to your ad campaigns.
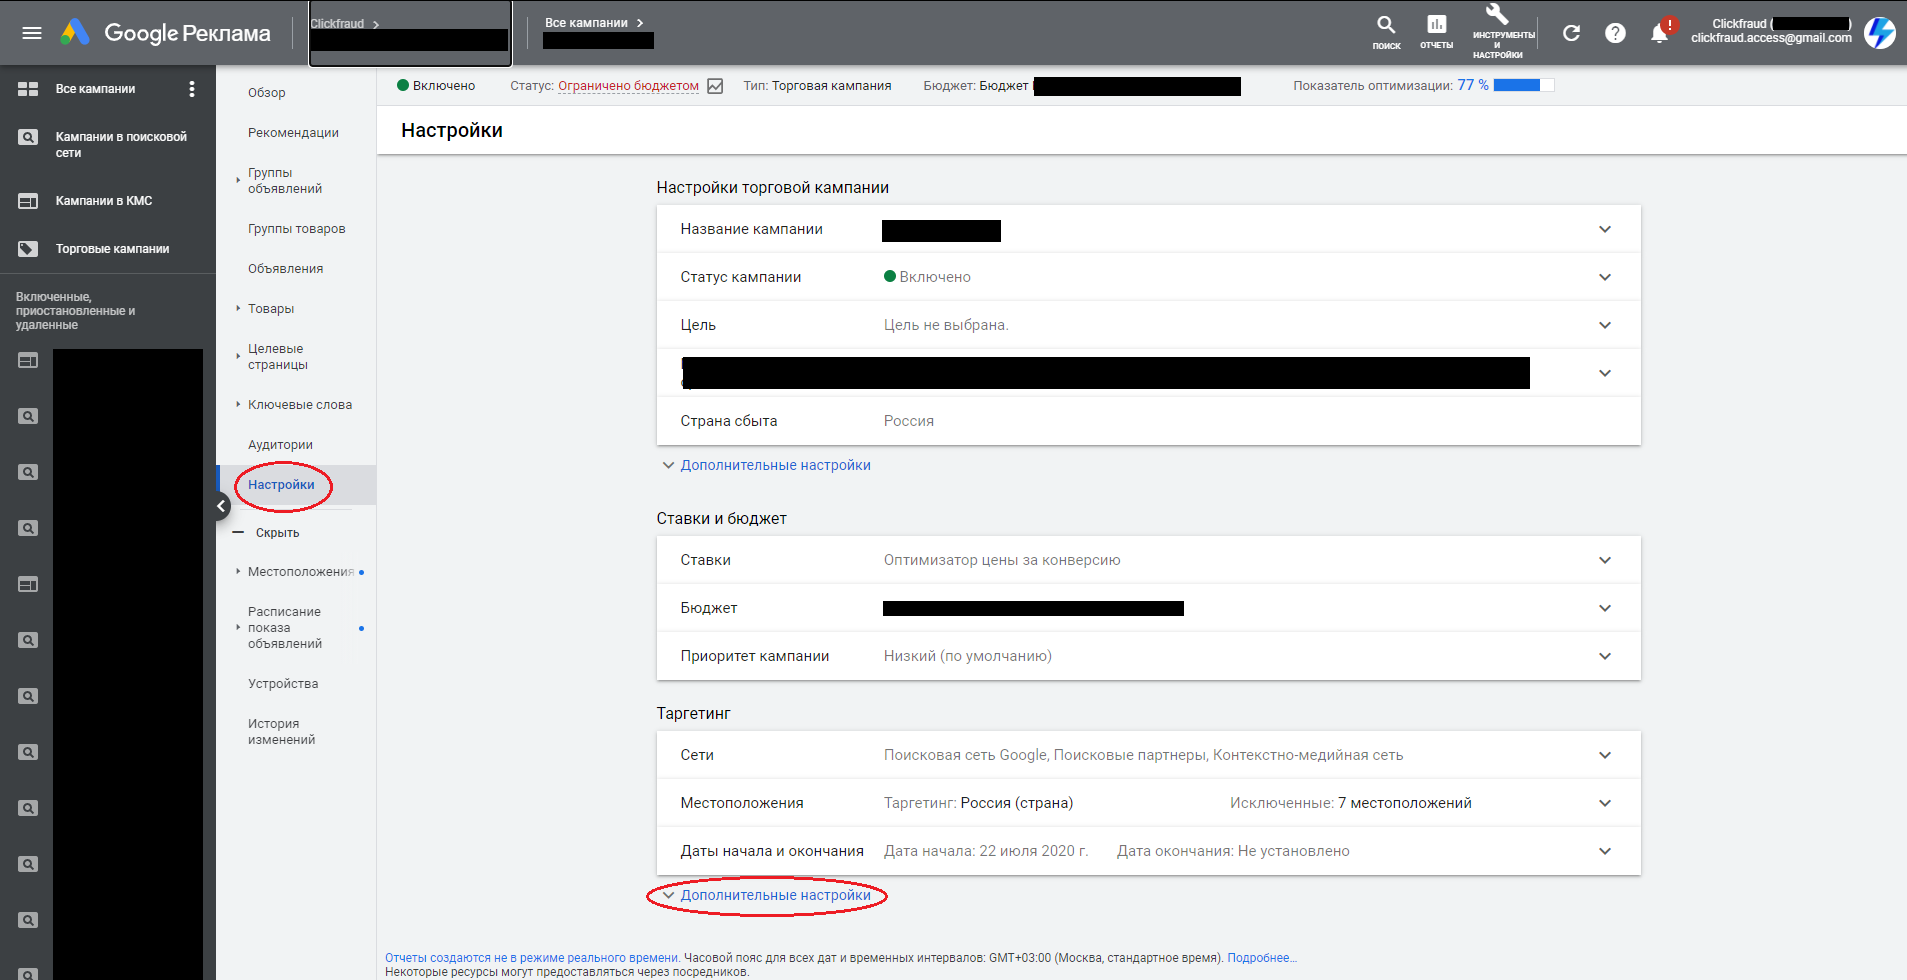
Once Google Ads protection is enabled and our system begins to shield your campaigns from click fraud, the results can be verified in your Google Ads account settings, as illustrated below. You should notice bot IP addresses automatically appended to the exclusion list.
Setting up Yandex.Direct Protection
If you’ve implemented click fraud protection, you can monitor all blocking activities in the Statistics section of our dashboard.
To review blocked visits from Yandex.Metrica or Yandex.Direct, follow these steps:
After integrating, a segment with the “isBadSession” parameter should have been established. We route all blocked sessions identified by a specific ClientID to this segment.
The appearance of blocked visits in the Metrica segment is as shown below:
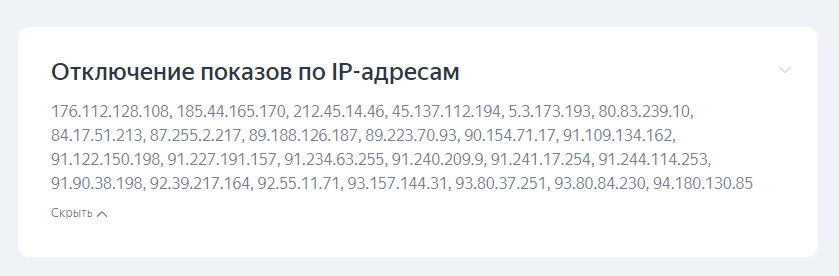
In Yandex.Direct, IP address blocking is utilized. To view this, go to the list of ad campaigns, select one, hit the “edit” button, scroll to the bottom, click on “additional settings,” and proceed to the “Exclusion of displays by IP addresses” area. Here, you’ll find the list of blocked visits, which is regularly updated – newer IP addresses replace the oldest ones. Periodically, this information is also transferred to Yandex.Metrica, where visits with the designated ClientID are incorporated into the segment.
Note that if bots target your ad campaigns using numerous proxies, such as 400 or 500, and there’s no daily budget cap on these campaigns, this could adversely affect your budget. It’s vital to regularly assess the analytical data in our dashboard and adjust your ad campaign settings as needed. For instance, you might want to deactivate sites in the Yandex Advertising Network.
We are committed to continuously broadening the scope of analytical data to help fight click fraud.
Access tokens can be obtained as detailed in these guidelines.
Generally, with complete account access, obtaining tokens is straightforward. However, there are instances where the founder of the Yandex.Metrica/Yandex.Direct account may not be able to create a token with all necessary rights. The following steps can help in such situations:
Issue with Yandex.Metrica Token
At times, an issue arises because the person who set up the Metrica counter doesn’t possess explicit rights to edit. These rights must be conferred via a different account that holds the necessary permissions. To address this issue, bestow editing rights on a different account (go to Metrica/Settings/Access), sign into our control panel with this account, and generate the token. This should rectify the problem with the Metrica token. If issues persist, reach out to our website’s support chat.
Issue with Yandex.Direct Token
Token errors can manifest in two scenarios:
- For agencies granting access to a master account in Yandex.Direct, it’s crucial to indicate the client’s login for whom protection is intended.
- If you’re signed into the account where the ads are managed, resolve this by navigating to “Information” and then “Your representatives” in the Yandex.Direct left menu. Add a full-rights representative, log into our dashboard with that representative’s details, and include the Yandex.Direct token.
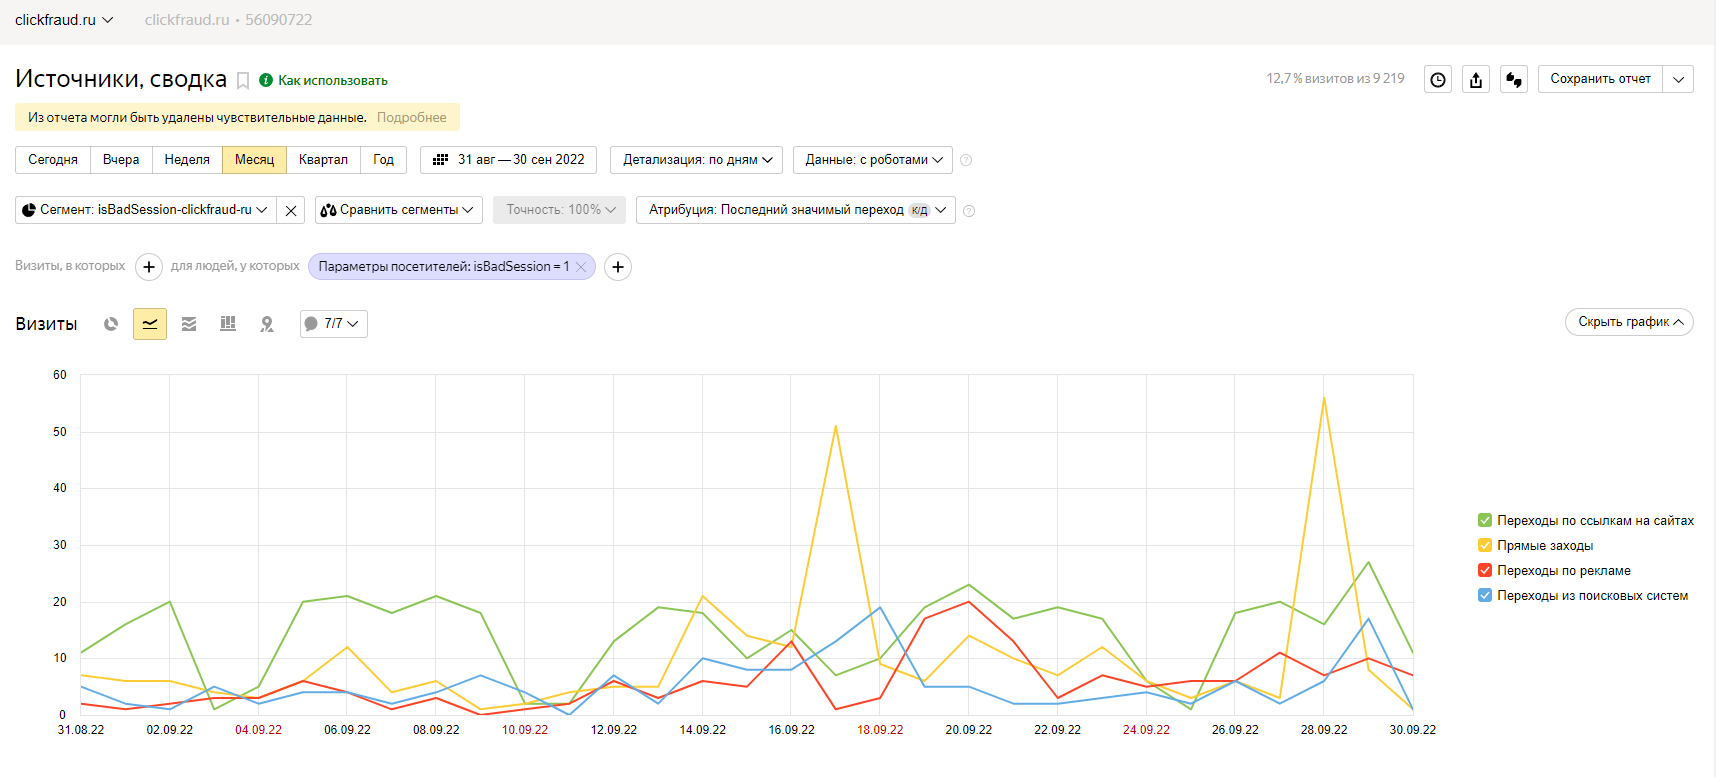
For those who need to independently assess the effectiveness of the blocks in the “isBadSession” segment, it’s possible to evaluate this in the Report Wizard. This review can be conducted by following the steps depicted in the images below, but remember, this is feasible only if the segment’s bid setting is not at 100%.
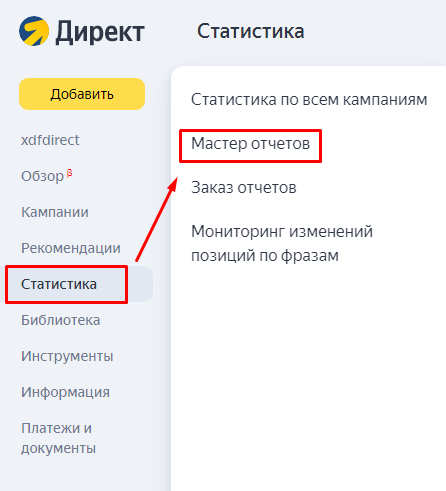
Where to access this report?
In Yandex.Direct, navigate to the Report Wizard found within the Statistics section. Its location is demonstrated in the image below:
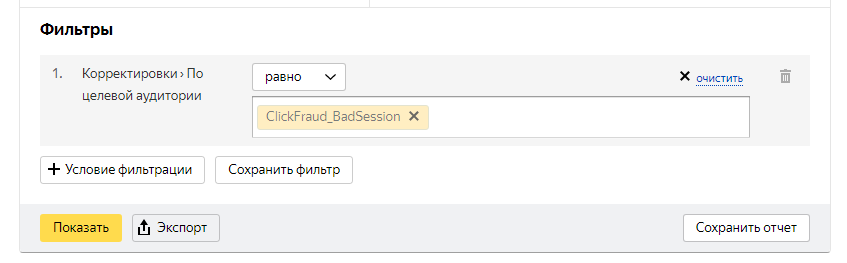
To generate a new report in the Report Wizard, use the designated parameters:
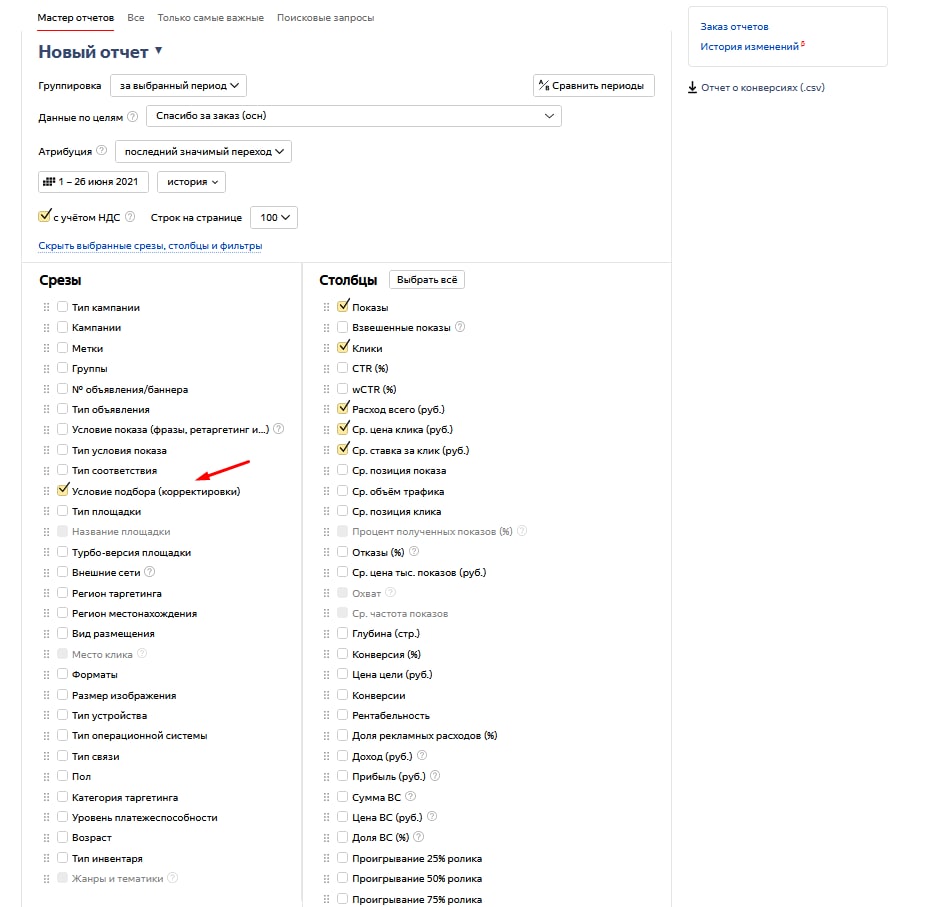
Look for the “isBadSession” segment in the filters, which you should have created as per our guidance. Keep in mind that you can name this segment whatever you like. After selecting the segment, press the Show button to initiate the report creation.

If required, you can refresh the tokens in your personal dashboard. This may be necessary, for example, if there’s a change in the metric counter code or if the existing token is invalid.
To refresh the tokens, click the grey question mark icon near the token input field. Here’s a sample screenshot demonstrating how to get the Yandex.Direct token link:
The process for acquiring the Yandex.Metrica token follows a similar method.
Attention! For an accurate update of the Yandex.Metrica/Direct token, ensure you are signed into the appropriate Yandex.Metrica/Direct account with the authority to edit. If not, the token will stay as it is and be ineffective. For any issues encountered with the tokens, you may consult this guide.
Should you modify the metric counter code, remember to include a Metrica segment using the isBadSession parameter and adjust the bid in Audiences to -90% for the new counter. You can find the segment creation instructions here.
Significant! If your ad campaigns are distributed across multiple Yandex.Direct accounts, you can only transfer blocked IP addresses to the account listed in our personal dashboard. To handle campaigns in each distinct account, the respective account’s token is required. Agency representatives using an agency representative’s token must supply the client’s login details for the accounts they intend to manage. Managing data from several accounts simultaneously is not feasible. Token-based access is restricted to campaigns associated with the login for which the token was issued.
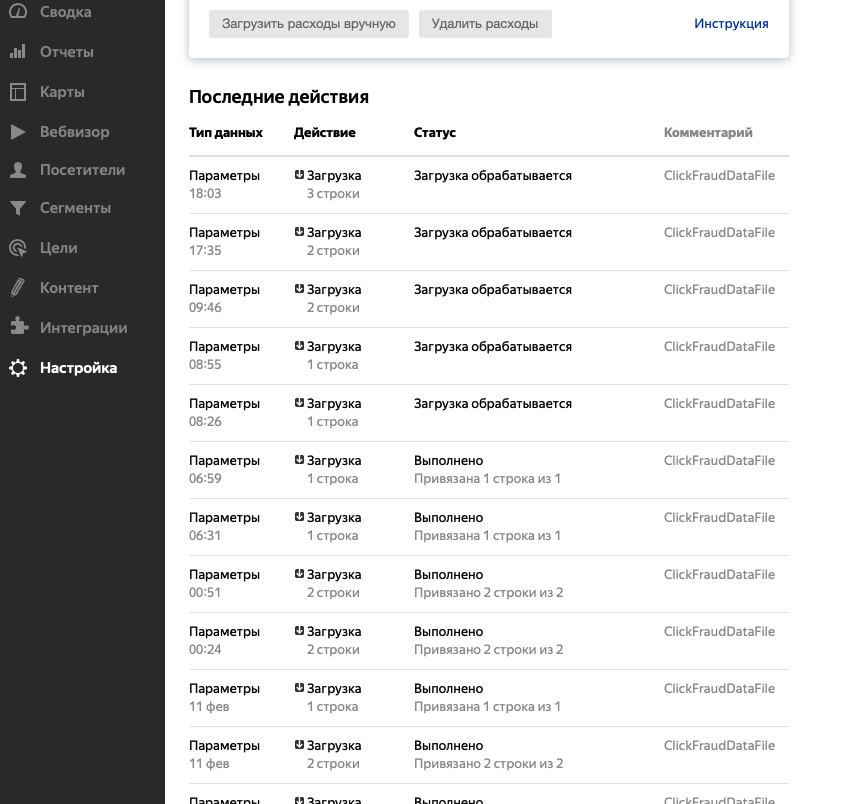
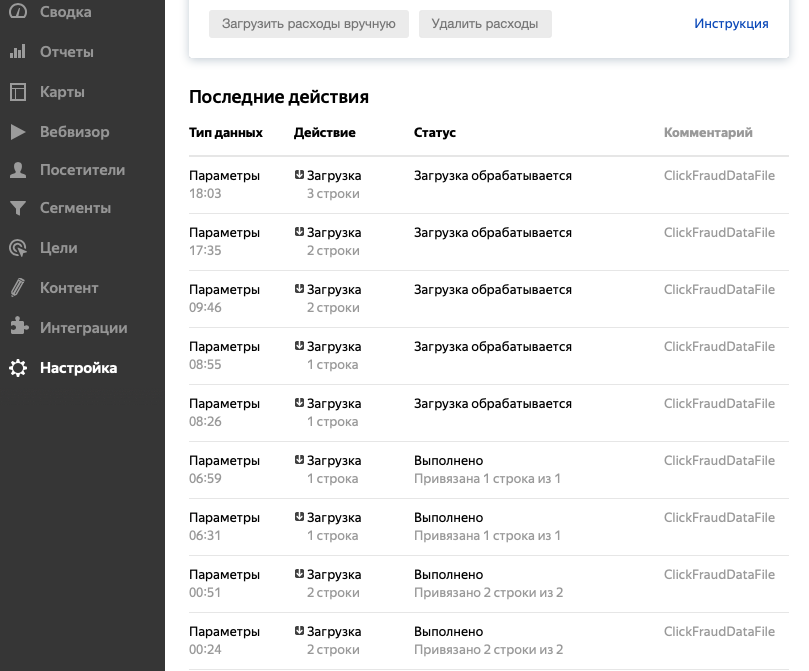
In the Yandex.Metrica system, it’s necessary to establish a SEGMENT using the isBadSession parameter (detailed steps for creation are outlined further in this document). After setting it up, verify that data is being received in Yandex.Metrica. This can be checked in the Settings / Data upload area (data usually shows up a few hours after the GTM code is properly implemented on the site, but occasionally it may take until the next day). Information is transmitted to your Yandex.Metrica system every 10 minutes through an API. A red “Binding Error” message in this section indicates that the ClientID transmitted could not be found in the Yandex.Metrica database. This rare occurrence can happen if Yandex.Metrica fails to register a bot visit.
We don’t set up a SEGMENT for you as we don’t have access to your Yandex.Direct and Yandex.Metrica accounts and can’t see the outcomes of your SEGMENT creation. If the SEGMENT isn’t filling or data isn’t appearing in the Settings / Data upload area within a day of following the provided instructions, please contact our chat support on our website with the issue details. If needed, grant us access to your Yandex.Metrica at traffic@clickfraud.dev (view-only access is adequate), and we’ll perform a check. Notify us in the support chat after granting access.
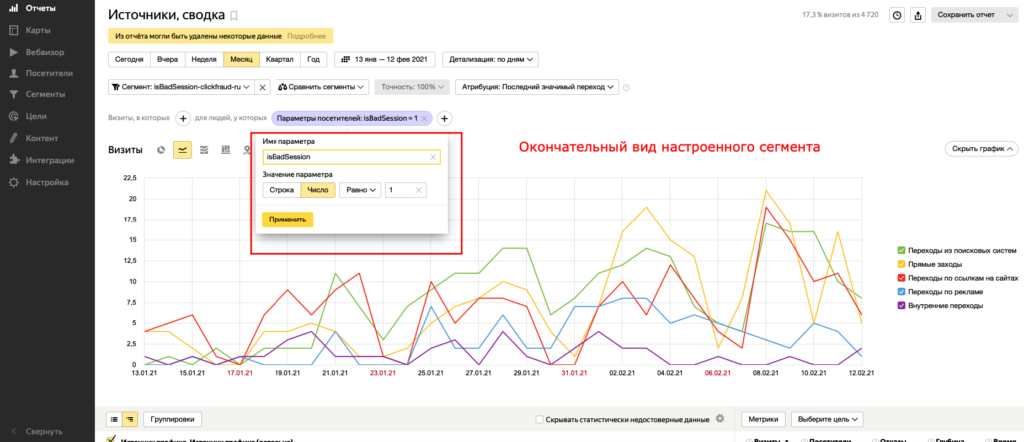
Here’s an example of correct data reception (step-by-step SEGMENT creation guide is provided below):
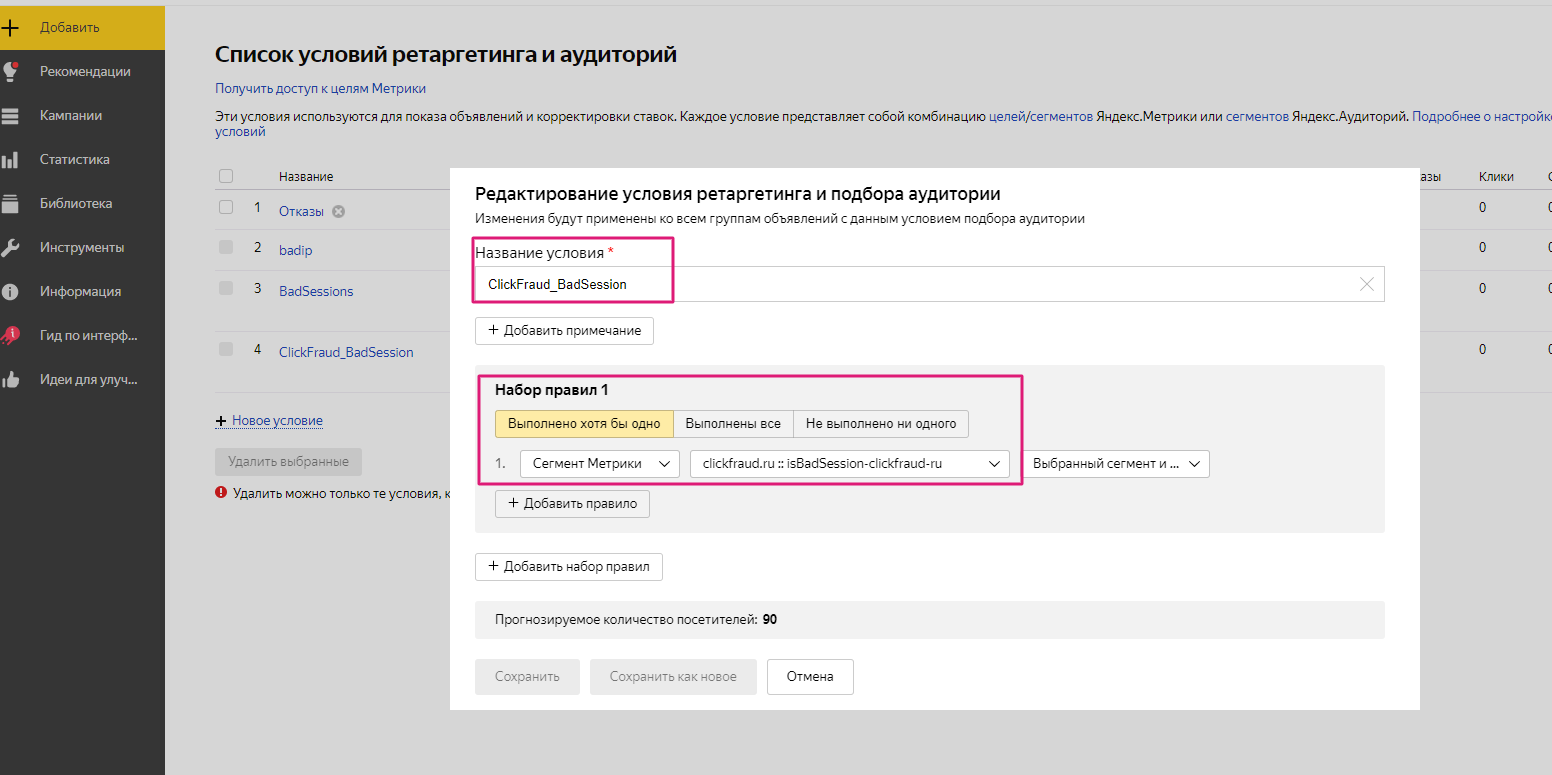
COMPLETE GUIDE TO SEGMENT CREATION AND INTEGRATION
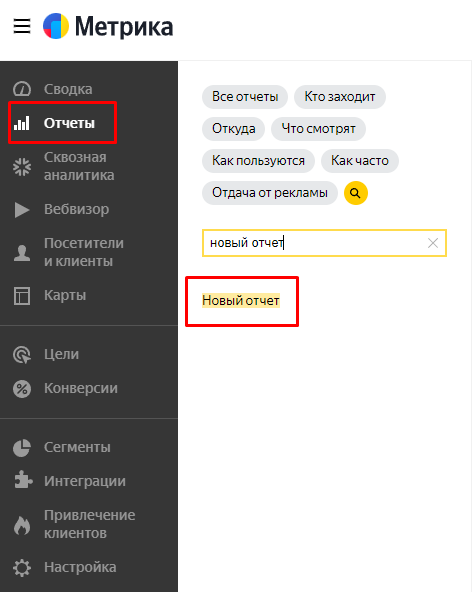
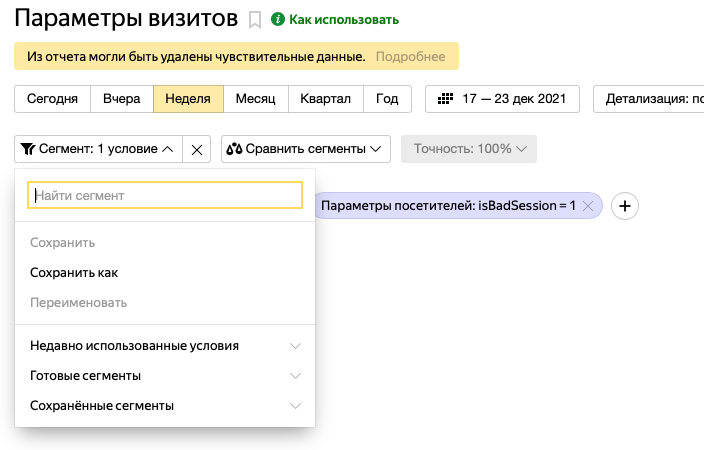
1 In Yandex.Metrica, access the Reports section. Start a new report and use isBadSession as the parameter name. The SEGMENT creation process in Yandex.Metrica is depicted in these images:
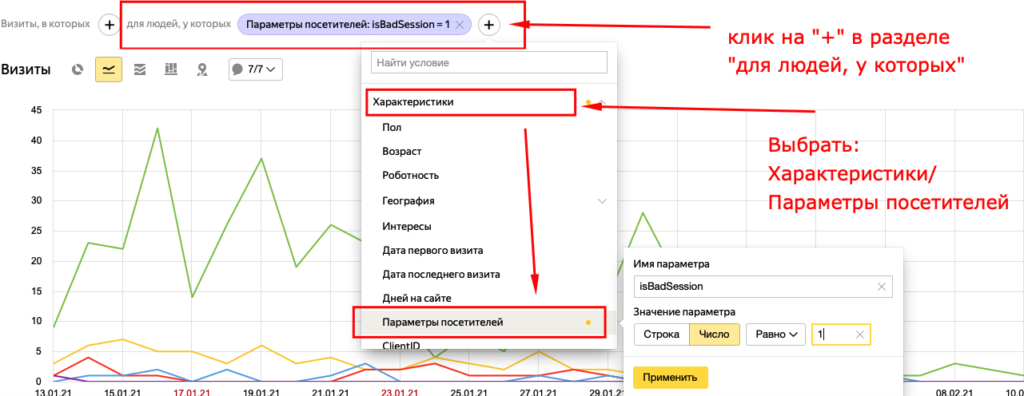
Remember to preserve the segment after adding isBadSession. Fill in a name (any name) in the form below. This name will be used later for bid adjustments (step 4). To save, enter a name and select “Save as.”
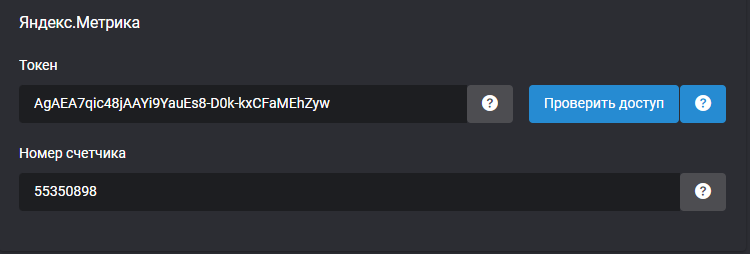
2. Verify the Yandex.Metrica token’s accuracy, which should start with AgAAAAA. Ensure you had Metrica account editing rights and were logged into it when acquiring the token (the link is accessible by clicking the gray question mark). Confirm the token’s validity by using the “Check Access” button.
3. After creating the SEGMENT, adjust bids in Yandex.Direct for this SEGMENT by -90%. This bid modification should be applied once in Yandex.Direct for all advertising campaigns. Access the “Bid Adjustments” section in each campaign’s settings in Yandex.Direct:
Why we suggest a -90% bid instead of -100%: More details at – https://clickfraud.dev/knowledge/nastrojka-zashhity-yandeks-direkt/pochemu-my-rekomenduem-delat-stavku-segmentu-90/

Important! In Yandex.Direct, you can now create your own Audiences based on criteria like a Yandex.Metrica segment. Create a new Audience from the Yandex.Metrica segment by clicking “Setting conditions” in the “Bid adjustments” area of your Yandex.Direct campaigns.
Ultimately, we’ve made a new Audience in Yandex.Direct, comprising the Yandex.Metrica segment with suspicious users, and set a -90% bid adjustment for it.
Note that the names for the Yandex.Metrica segment and Yandex.Direct audience can be anything – they don’t have to match the examples.
4. Periodically check the Yandex.Metrica token you created at registration, as it may expire (its usual lifespan is over six months, but it can be shorter). Check the “Settings/Upload data” section for new SEGMENT data or the token’s validity in our dashboard every 5-7 days using the “check access” button next to the Metrica token.
Attention! To update the Metrica token correctly, log into the required Yandex.Metrica account with editing rights. Otherwise, the token will remain unchanged and non-functional.
In Yandex.Metrica, we transmit a distinct parameter called ClickFraudDataFile. However, occasionally Metrica may not process all the transmitted data, typically due to various factors:
- Yandex.Metrica employs different bot detection algorithms (which are less strict than ours). As a result, for those visitors identified as bots by Metrica, the yandexClientId isn’t created, preventing us from adding them to the exclusion segment.
- Visitors may enter your site but exit swiftly before the Metrica counter can fully load.
- It’s possible that other scripts interfere with the Clickfraud counter’s functionality; you can verify this in the web browser’s console.
- The Metrica counter might be hindered by other scripts, such as Adblock.
It’s crucial to understand that the Yandex.Metrica segment serves as a supportive measure for protection and might not be consistently updated, even when the click fraud protection is operating correctly. In these scenarios, we tackle the attacking bot by employing IP exclusion lists. These lists are accessible for each ad campaign in Yandex.Direct.
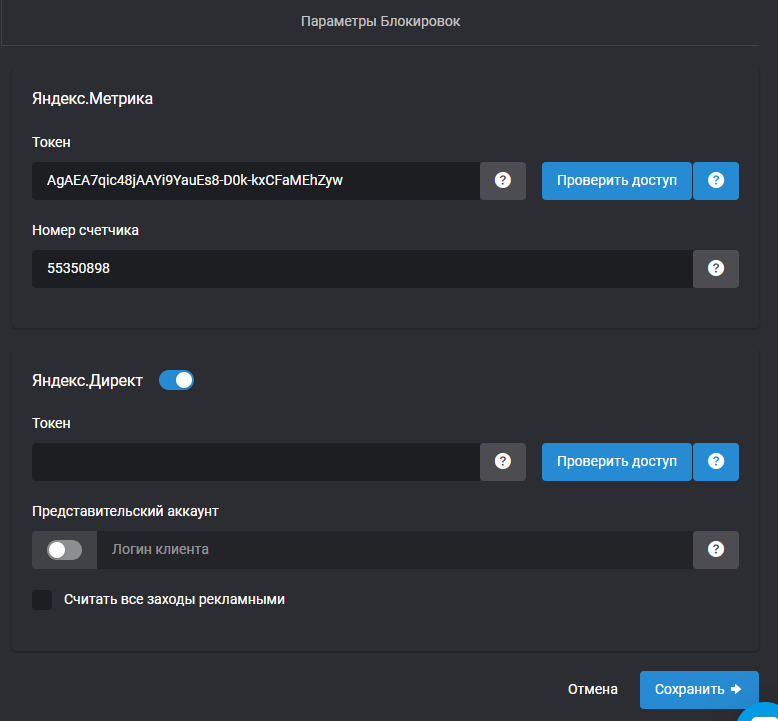
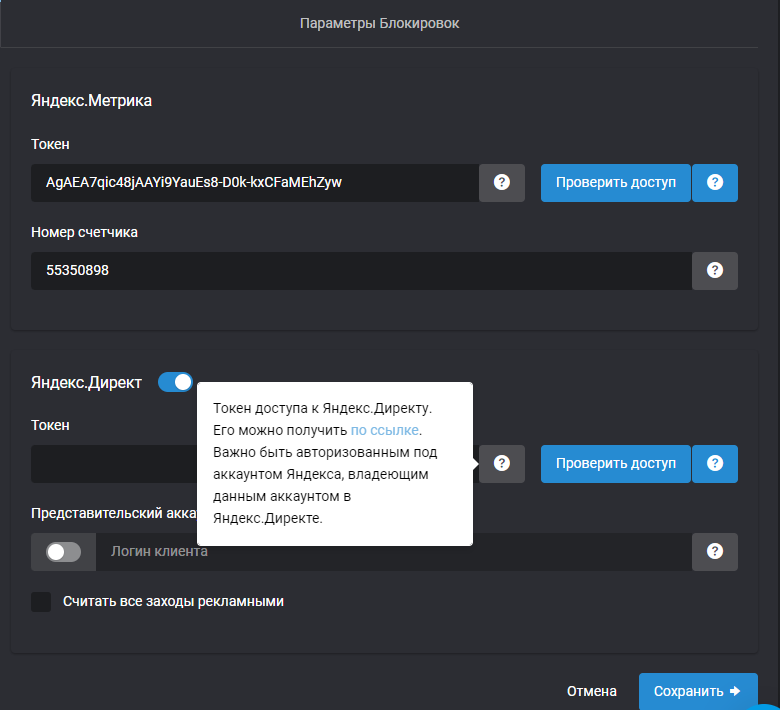
In your control panel, you have the option to activate extra safeguards for Yandex.Direct through API (which includes blocking IP addresses). This requires obtaining a token, which can be found on the website’s edit page under the “Basic Settings” category, as illustrated in the image below:
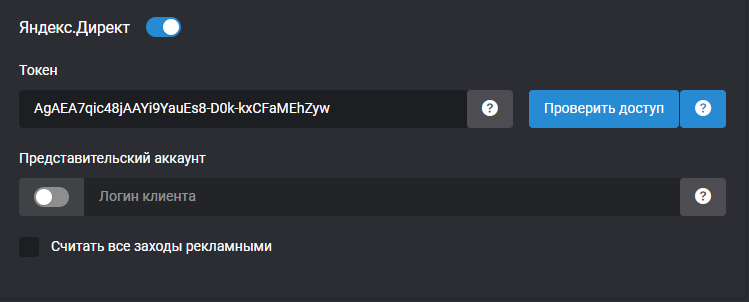
Important! To successfully update the Yandex.Direct token, ensure you are logged into the appropriate Yandex.Direct account with the necessary editing privileges. Failing to do so will result in the token staying inactive and non-functional. Should you face any issues while acquiring the correct token, kindly refer to this guide.
In case you manage a representative account (an account overseeing multiple client accounts with advertising campaigns), you must also enter the username of the client whose ad campaigns you wish to safeguard against click fraud.
Crucial! If your ad campaigns are hosted across several Yandex.Direct accounts, blocking IP addresses can only be applied to the account designated in our user area. To interact with campaigns in each individual account, the respective account’s token must be specified. For agency managers using an agency representative token, it’s essential to include the header with the client’s login information you intend to manage. Handling multiple accounts simultaneously is not feasible. Token access is limited to campaigns under the login for which the token was issued.